Mistakes in rebar for beam placement can seriously reduce structural support, increase crack risks, and affect long-term safety. Whether you are comparing rebar for beam, rebar for column, or rebar for concrete slab applications, understanding correct spacing, anchorage, and load transfer is essential. This guide explains the most common beam reinforcement errors and how the right steel angle for construction and material selection can improve project performance.
When people search for beam reinforcement mistakes, they usually do not want a textbook definition. They want to know what actually goes wrong on site, how those errors weaken support, what warning signs to look for, and how to avoid expensive structural repairs later. The short answer is simple: most beam failures linked to reinforcement are not caused by steel being present, but by steel being misplaced, insufficiently anchored, poorly detailed, or installed without control over cover, lap length, and load path continuity.
For contractors, engineers, project managers, buyers, and quality teams, this topic matters because beam reinforcement errors can create hidden risk. A beam may look acceptable after concrete pouring, yet still suffer from reduced bending capacity, poor shear resistance, wider cracks, excessive deflection, or premature corrosion. In commercial terms, that means rework, inspection delays, compliance issues, disputes, and long-term maintenance cost. In safety terms, it means reduced structural reliability where support is needed most.
This article focuses on the mistakes that matter most in practice: wrong bar placement, inadequate spacing, poor stirrup arrangement, weak anchorage, incorrect lap splices, insufficient cover, bar congestion, and mismatch between design intent and installation reality. It also explains how to check reinforcement quality before concrete placement, and how material selection and supply consistency affect beam performance across housing, bridges, industrial buildings, and infrastructure projects.
Why beam reinforcement placement matters more than many teams expect
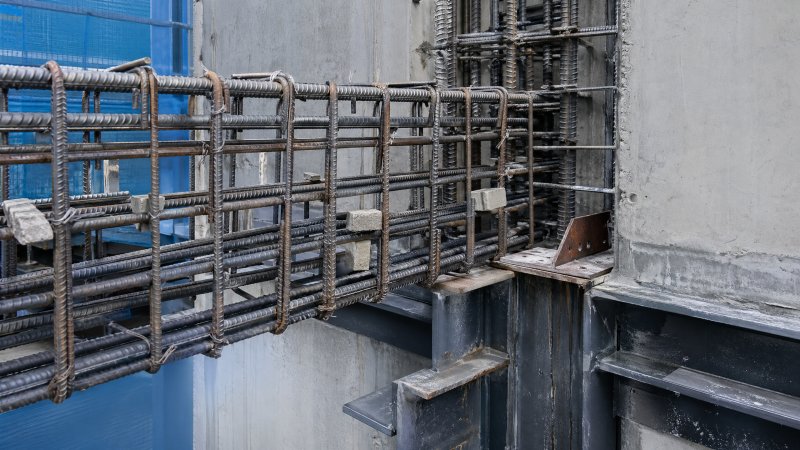
A reinforced concrete beam works by combining concrete’s compressive strength with steel’s tensile capacity. In a simply supported beam, the lower zone usually resists tension near midspan, while the upper zone may carry tension near supports in continuous spans. If the bars are not in the intended position, the beam does not develop the design strength even if the bar diameter and quantity appear correct on paper.
This is why beam reinforcement mistakes are so dangerous: they often stay hidden after the pour. Once concrete hardens, it becomes difficult and costly to verify whether top bars stayed high enough, bottom bars kept their cover, stirrups remained correctly spaced, or hooks and development lengths were installed according to drawings. Many support problems start not with dramatic design errors, but with small site deviations that accumulate across multiple beams.
Compared with slab reinforcement, beam reinforcement usually has higher stress concentration and a more critical role in load transfer. Compared with column reinforcement, beams are more sensitive to exact bar positioning because bending behavior depends heavily on lever arm and internal force distribution. That means a few centimeters of placement error can reduce effective depth, reduce moment capacity, and alter crack behavior far more than non-specialists may assume.
The most common rebar placement mistakes that weaken beam support
One of the most frequent mistakes is placing bottom bars too high or top bars too low. This reduces the effective depth of the beam and directly lowers bending resistance. In simple terms, the reinforcement is no longer working where the design intended it to work. Workers sometimes shift bars during tying, formwork adjustment, or concrete vibration, especially when spacers are missing or insufficient.
Another major problem is incorrect stirrup spacing. Stirrups are not just secondary steel; they are essential for shear resistance, confinement, and crack control. When stirrups are spaced too far apart, omitted near supports, or not properly closed with the required hooks, the beam becomes more vulnerable to diagonal shear cracking and brittle behavior. This issue is especially critical in heavily loaded beams, transfer beams, and seismic zones.
Improper anchorage and insufficient development length are also common. If the bar does not extend far enough into the support region, the force cannot be fully transferred. The result may be slippage, end cracking, or reduced load-carrying capacity under service and ultimate conditions. This is often seen where bars are cut short to save material, where detailing is misunderstood, or where site teams substitute one bar arrangement for another without engineering approval.
Wrong lap splice location can be equally harmful. Splices placed in high-stress zones weaken the continuity of the reinforcement system. If multiple bars are lapped at the same section, congestion increases and structural performance may decrease. The problem becomes worse when lap lengths are too short, bars are not aligned, or concrete compaction around the splice zone is poor.
Insufficient concrete cover is another mistake with both structural and durability consequences. Too little cover exposes bars to corrosion risk, especially in humid, coastal, or chemically aggressive environments. Too much unintended cover, however, can move bars away from the optimal structural zone and reduce performance. Proper cover blocks, chairs, and inspection controls are therefore not optional accessories; they are part of structural quality assurance.
How these mistakes show up in real structures
Beam reinforcement errors do not always lead to immediate collapse, which is why some teams underestimate them. More commonly, the first signs are serviceability problems: wider cracks at the bottom of midspan, cracks near supports, visible deflection, floor vibration, or local concrete spalling. In industrial or public-use buildings, these symptoms may disrupt operations long before anyone talks about structural strengthening.
In bridges, highways, tunnels, culverts, and foundations, reinforcement placement problems often become visible under repeated loading, thermal movement, or moisture exposure. A beam with poor anchorage or insufficient shear reinforcement may survive early service conditions but degrade faster under cyclic loads. Once deterioration starts, maintenance costs rise sharply because repair access is difficult and traffic or plant operations may be affected.
From a quality-control perspective, beam defects often trigger broader project consequences. If inspection records are incomplete, photos are missing, or reinforcement deviations were not approved, disputes can arise between contractor, consultant, and owner. For procurement and management teams, this is a reminder that support performance depends not only on design specification but also on traceable material supply, fabrication accuracy, and installation discipline.
What to check before concrete pouring: a practical site control list
The most effective time to prevent beam reinforcement mistakes is before concrete placement. Once the pour begins, correction becomes difficult. A practical inspection should start with the approved drawings and bar bending schedule. The team should confirm bar diameters, quantities, lengths, bending details, stirrup types, spacing zones, lap locations, and support conditions. Visual familiarity is not enough; every beam type should be checked against documented requirements.
Next, verify actual positioning inside the formwork. Check whether bottom bars are resting on proper spacers, whether top bars are held at the correct level, and whether chairs or supports are sufficient to prevent movement during traffic and vibration. Measure concrete cover rather than estimating it by eye. Confirm that stirrups are vertical, properly hooked, and tightened so they do not open during handling.
It is also important to review congestion risks. In beams with multiple layers, large bar diameters, embedded items, or intersecting slab and column reinforcement, spacing can become too tight for proper concrete flow. That may create honeycombing or voids around the steel. A beam that is “correct” on paper can still underperform if the concrete cannot fully encase the bars. Practical constructability review should therefore be part of reinforcement quality control.
Finally, create a hold-point process. Before pouring, the responsible engineer, supervisor, or inspector should sign off on reinforcement checks, cover checks, splice verification, cleanliness, and embedded items. This step protects safety and also protects project stakeholders by creating traceable evidence that reinforcement was installed according to requirement, not assumption.
How material choice and manufacturing consistency affect beam reinforcement quality
Placement quality is critical, but material quality matters just as much. Bars with inconsistent diameter, poor rib geometry, uncertain mechanical properties, or weak traceability make beam performance harder to predict. For international projects, procurement teams often need steel that aligns with ASTM, EN, JIS, or GB expectations while also fitting local detailing and inspection practice. This is why manufacturer reliability is part of structural risk control, not just a purchasing detail.
For projects in houses, bridges, roads, railways, dams, tunnels, walls, slabs, columns, and beams, buyers often compare grade, size range, tolerance, and certification before placing orders. A product line such as Rebar can support these applications through options including HRB335, HRB400, and HRB500, with common sizes from 6mm to 50mm, hot rolled or cold rolled processing, and tolerance control at ±1%. Compliance references such as BS4449-2005, JIS G3112-2004, ASTM A615-A615M-04a, ISO, SGS, and BV help technical evaluators and quality teams review suitability for cross-border supply.
Surface condition and packaging should not be ignored either. Depending on storage and transport conditions, buyers may consider black finish, galvanized surfaces, transparent oil, anti-rust oil, PVC, or color painting for different logistics needs. Even high-grade reinforcement can create site issues if corrosion, mislabeling, mixed heats, or poor bundling complicate identification and placement. Consistent supply from a manufacturer with stable production and documented quality control reduces these avoidable risks.
How to avoid support problems when beam, column, and slab reinforcement intersect
Some of the worst beam reinforcement mistakes happen at intersections, not in the straight span. Where beams connect to columns or integrate with slabs, site teams may improvise because space is limited and multiple systems compete for position. If beam bars are pushed aside to fit column cages, or slab bars displace top beam steel, the beam may lose the reinforcement geometry required for proper support behavior.
The best solution is coordination before installation, not adjustment during tying. Review combined reinforcement drawings, identify congestion zones, and check whether bar layering, anchorage direction, and splice locations are realistic. In complex structures, 3D detailing or pre-assembly review can prevent conflicts that would otherwise be solved incorrectly in the field. This is especially useful in transfer structures, deep beams, podium slabs, and industrial equipment supports.
Clear communication between design, fabrication, procurement, and site supervision is also essential. Fabricated bars should match the latest approved details. If substitutions are necessary due to stock availability or shipment timing, they should be technically reviewed rather than casually accepted. Support strength depends on the whole system working together, so beam steel cannot be assessed in isolation from surrounding reinforcement and concrete placement sequence.
What buyers, managers, and project decision-makers should evaluate
For decision-makers, the lesson is straightforward: reinforcement risk is not only a site issue. It begins with specification clarity, supplier qualification, fabrication control, delivery reliability, and inspection planning. A low unit price can become expensive if the supplied steel lacks traceability, arrives with inconsistent lengths, or causes installation delays that affect the concrete schedule and labor productivity.
Technical evaluators should look for more than grade labels. They should review standards compliance, mechanical property consistency, size availability, rolling process, documentation, and the supplier’s ability to support customized structural steel needs. Project managers should ask whether the chosen supply partner can maintain dependable lead times and quality across repeated orders, especially for export projects where replacement material may not arrive quickly.
For financial approvers and business evaluators, the value case is also clear. Better reinforcement quality and control reduce rework, lower inspection failure risk, improve schedule certainty, and protect long-term asset performance. In beam construction, these benefits often outweigh small upfront cost differences because structural repairs after pouring are disruptive, slow, and highly visible to owners, auditors, and end users.
Conclusion: correct placement is what turns reinforcement into real support
Beam support is weakened not only by missing steel, but by steel that is wrongly positioned, poorly anchored, badly spaced, or installed without control. The most common mistakes involve top and bottom bar misplacement, inadequate stirrups, short development length, poor lap splices, insufficient cover, and congestion at beam-column-slab intersections. These errors reduce strength, worsen crack behavior, and increase long-term durability risk.
The most useful response is practical rather than theoretical: inspect before pouring, verify geometry against drawings, control cover and stirrup spacing, review anchorage and splice zones carefully, and choose steel products with reliable quality and certification support. For engineers and operators, this improves structural performance. For buyers and project leaders, it reduces sourcing risk, rework cost, and schedule uncertainty.
In the end, a beam is only as reliable as the reinforcement system actually built inside it. Good design matters, but correct execution and dependable material supply are what turn design intent into safe, durable structural support.
Please give us a message


Please enter what you want to find