A wall can look finished on the day galvanized sheets are installed and still begin to cause trouble a few months later. In washrooms, utility rooms, food-preparation areas, changing rooms, workshops with washdown cleaning, and similar spaces, water rarely reaches the wall only as a direct splash. It also appears as vapor, condensation behind cold panels, water running down joints, and moisture trapped at the bottom edge.
The familiar early signs are small: a dark line at a lap joint, sealant pulling away near a corner, a screw head showing orange staining, or a panel that sounds hollow when pressed. If ignored, these details can lead to hidden corrosion, damp backing materials, loose sheets, difficult cleaning, and repairs that require removing sections of an otherwise sound wall. The installation approach needs to treat galvanized wall sheets as part of a complete wet-area wall assembly, not simply as metal panels attached to framing.
Start by deciding what the sheet is expected to do
Before measuring the first panel, clarify whether the steel sheet is intended to be an exposed hygienic lining, a protective cladding layer, or the outer face of a wall system that already has a waterproof barrier behind it. This distinction changes the installation method.
Galvanized steel has a zinc coating that provides corrosion resistance, but the coating is not a substitute for a correctly designed waterproofing system. In areas where water may enter behind the cladding, the wall behind the sheet must be able to resist that exposure or drain and dry appropriately. A panel surface can remain clean and intact while moisture is collecting unseen at fasteners, edges, or cavities.
For a low-splash utility room, a dry and stable substrate with sealed sheet joints may be appropriate. For shower surrounds, washdown zones, or rooms with frequent condensation, it is usually safer to use a waterproof backing system and design the cladding so water is directed outward rather than trapped behind the metal. Where chemical cleaning agents, salt exposure, or persistent standing water are involved, confirm that galvanized material is suitable for the actual environment. Zinc coatings can be attacked by some chemical conditions, particularly where moisture remains for long periods.
The wall behind the panels deserves as much attention as the visible face
A common installation mistake is fastening sheets directly onto a wall that is uneven, damp, or still releasing moisture from recent construction. The panel may hide the condition temporarily, but it cannot correct it. Any trapped moisture can condense on the colder metal face or corrode the reverse side of the sheet.
Inspect the substrate before work begins. It should be structurally firm, dry, reasonably flat, and free from loose paint, friable plaster, mold growth, or projecting fasteners. If timber battens are used, they should be straight, dry, and arranged so they support all panel edges and provide sufficient fixing locations. If steel framing is used, check that its coating and the panel coating are compatible and that cut framing ends are protected where required.
In wet environments, cavities need a clear moisture strategy. A fully enclosed cavity with no drainage or ventilation can hold humid air for a long time. Depending on the wall design, this may mean using a suitable membrane behind the cladding, arranging drainage at the lower edge, or maintaining an air space that is not blocked by careless sealant application. The correct choice depends on the building assembly and local construction requirements, but the principle is constant: do not create a hidden pocket where water can enter but cannot leave.
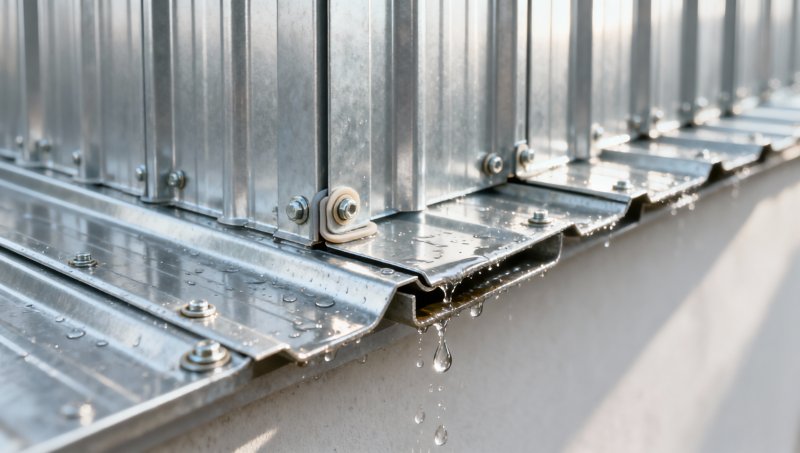
Use a long straightedge across the wall in several directions. Small irregularities can usually be packed out before installation. Larger bows and twists should be corrected first. Galvanized sheet can bridge minor variations, but forcing a thin panel over a distorted surface produces oil-canning, stressed fastener holes, uneven laps, and joints that are difficult to seal properly.
Plan the panel layout around water movement
It is tempting to start at the nearest corner and use whatever panel orientation creates the fewest cuts. In wet areas, the layout should first consider where water will travel. Vertical sheets are often practical because water can run downward with fewer horizontal ledges. If horizontal sheets are used, the overlap must be arranged like roof shingles: the upper sheet laps over the lower sheet so water is encouraged to stay on the exposed surface rather than being driven into the joint.
Mark the starting line with a level or laser. Do not assume the floor, ceiling, or an existing corner is square. If the first sheet is out of plumb, every successive seam may drift, leaving a narrow and difficult-to-seal strip at the final edge. Plan panel widths at openings, internal corners, pipe penetrations, and floor transitions before cutting any material.
Where sheets overlap, use the manufacturer’s recommended lap arrangement if one is available. If not, make the direction of the lap consistent with expected water flow and cleaning direction. Avoid locating seams directly behind regularly sprayed equipment, hose stations, or faucets where possible. A seam can be durable when correctly sealed, but reducing its exposure is usually better than relying on sealant alone.
At the bottom of the wall, do not allow a cut edge to sit in standing water. Leave the required clearance above the finished floor or install an appropriate base flashing or trim detail. The exact detail must work with the floor waterproofing and cleaning method. A floor that is frequently washed needs a transition that sheds water forward, not one that creates a narrow uncleanable channel behind the panel.
Choose fasteners and sealants as a matched group
Fasteners are often the first place where a wet-area installation fails. A screw may look acceptable during installation but corrode early if its coating is unsuitable, if it reacts with adjacent metals, or if its washer does not seal the penetration. Use corrosion-resistant fasteners compatible with the galvanized coating and the supporting structure. Where exposed fixing heads are necessary, fasteners with sealing washers are commonly used, provided they are installed without damaging or over-compressing the washer.
Avoid mixing metals without considering galvanic corrosion. When dissimilar metals remain wet and electrically connected, one material can corrode faster than expected. This matters around aluminum trims, copper pipework, stainless components, and uncoated steel attachments. Separation tapes, compatible gaskets, or purpose-designed trims may be needed where materials meet. If there is uncertainty, consult the component supplier rather than assuming that all “corrosion-resistant” materials can be placed together.
Sealant selection is equally important. Use a sealant intended for wet-area service and compatible with galvanized surfaces, painted coatings if present, and adjoining materials. Some products adhere poorly to oily, dusty, or oxidized metal. Others may not tolerate repeated cleaning chemicals. Read the product instructions for surface preparation, bead size, curing conditions, and movement capability.
Do not use sealant as a filler for a badly formed joint. If two panels are distorted, poorly cut, or unsupported, a thick bead may hide the gap but will not make the joint reliable. Correct the fit first. Sealant works best when it is applied to a clean, controlled joint with enough space to bond to the intended surfaces.
A practical installation sequence that avoids trapped water
Clean each panel before fitting. Remove metal swarf, drilling debris, cutting dust, oil, and fingerprints from the surfaces that will be sealed. Steel swarf left in a wet area can rust rapidly and create staining that appears to come from the sheet itself. Keep cut edges neat; use suitable cutting tools that minimize heat damage and burrs. After cutting, remove sharp fragments and protect exposed edges where the system design calls for it.
Dry-fit the first panel and confirm its position before applying sealant. Check plumb, edge alignment, and support contact. Where a panel must move slightly because of thermal changes or building movement, do not clamp it so tightly that it buckles. Follow the sheet thickness, profile, and fastening guidance supplied for the product.
Apply sealant in the joint or behind a trim as planned, then set the panel without dragging it through excess material. Fasten from a controlled reference edge, working progressively across the sheet. This helps prevent waves from being locked into the panel. Drive screws square to the surface. A screw installed at an angle can deform the washer, enlarge the hole, and leave a path for moisture.
Fastener spacing should provide secure support without causing unnecessary penetrations. Edge distances matter: a screw too close to a sheet edge can tear the metal or distort the lap. A screw placed through an unsupported panel area can pull the sheet inward and create a low point where water collects. For long panels, check alignment repeatedly rather than waiting until the far edge has been fixed.
At corners, avoid relying on a simple butt joint if water exposure is significant. Use an appropriate internal or external corner trim, with the joint detail arranged so cleaning water cannot easily reach the concealed edge. Around pipes, valves, electrical boxes, and brackets, cut openings accurately. Oversized openings covered by a generous sealant ring are difficult to keep clean and more likely to fail as the building moves.
Pay close attention to the places that look finished but are not sealed
After the sheets are in place, inspect every termination: top edge, bottom edge, corners, overlaps, penetrations, door frames, windows, service openings, and transitions to other wall finishes. These are the locations where water usually enters first. Look for interrupted sealant beads, skipped fasteners, voids behind trims, open cut edges, and places where a panel edge points upward like a small shelf.
Sealant should form a continuous, smooth contact line rather than a rough surface that holds dirt. Tool it promptly according to the sealant instructions. If a joint is contaminated or the sealant skins over before tooling, remove and replace it rather than adding another layer over the top. Patch-on-patch repairs often leave weak adhesion and make later inspection harder.
Before the area is put into regular service, allow sealants and coatings to cure for the stated period. Early washing, steam exposure, or direct spray can interfere with adhesion. Once curing is complete, inspect the wall under normal lighting and, where appropriate, observe how water runs over representative joints. The goal is not to soak an unfinished wall cavity, but to verify that surface water sheds cleanly and no obvious pathway leads behind trims or sheets.
Problems that usually point to an installation detail
Condensation on the visible face does not always mean the sheets are defective. It may indicate high humidity, insufficient ventilation, a cold wall behind the cladding, or a thermal bridge at framing. Improve room ventilation and investigate insulation or vapor-control details rather than repeatedly resealing surface joints that are not the source of the moisture.
Rust staining near a fastener often suggests trapped debris, an incompatible screw, a damaged washer, or moisture entering around the penetration. Remove the cause where possible, clean the affected area, and replace unsuitable fasteners. Simply painting over the stain without correcting the water path is rarely a lasting repair.
If panel edges lift or sealant detaches, check whether the substrate moved, whether the joint was cleaned before sealing, and whether the gap was too large or too small for the sealant used. Rework only after the area is dry. Sealing over wet surfaces can trap moisture and reduce bond strength.
Keep the installed surface easy to inspect
Galvanized wall sheets in wet areas benefit from routine attention, especially after periods of heavy cleaning or high humidity. Wash the surface with cleaning products suitable for zinc-coated steel and rinse residues away when the cleaning method requires it. Avoid abrasive pads that damage the coating and avoid leaving aggressive chemicals on seams, cut edges, or fastener heads.
During normal cleaning, look at joints rather than only the broad panel faces. A change in sealant texture, a loose trim, persistent discoloration, or water collecting at the base deserves early action. Small repairs are much easier before moisture reaches the backing wall.
The durable result comes from disciplined details: a dry and supported substrate, a layout that follows water flow, compatible fasteners, carefully prepared joints, and edges that can drain instead of trapping moisture. When those conditions are in place, galvanized wall sheets can provide a practical, cleanable wall surface without turning hidden moisture into the next maintenance problem.
Please give us a message


Please enter what you want to find